The fabric store in town was having a great sale on Amy Butler's Midwest Modern collection and I had to take advantage of the great deal. I bought about 12 yards of fabric and didn't know what I was going to make with it. I have quite a few people that contact me looking for a baby shower gift, and I knew that gift baskets are very popular so with those two thoughts put together this is what I came up with and what I used my first two yards of that Amy Butler fabric. A tote that would be great for the changing station to hold diapers, wipes, lotion, diaper rash cream, etc. For those of you that think "I want that", shoot me a message if I don't have one up on my etsy and I would love to make one for you. For those of you who are like "I want to make that" here you go. If anything is unclear (I am not that good at giving directions!) leave me a message and I will try to explain.
I started with a rough drawing of what I was wanting to do, from there I made some measurements. Then I drew out measurements for 1 yard of fabric, then I came up with how to cut all of the pieces the most efficient way I could think of. (*key words here are, that I could think of...there might be a better way to cut out the pieces but it was late and this is what I came up with). I found that I would have enough fabric to make at least 2 burpies, 4 wash cloths, and a small blanket from the extra fabric (and still have some extra left from one of the fabrics).
What you will need:
1 yard fabric A
1 yard fabric B
1 yard interfacing
1 yard backing (I used chenille, but terry or flannel would work great too)
Iron if your interfacing needs to be ironed on like mine
Fabric cutting (make sure to cut the same from your interfacing): 4 x 13"x12" (2 of A, 2 of B); 4 x 7"x12" (2 of A, 2 of B); 2 x 10"x5" (1 of A, 1 of B); **optional: 2 x 13"x5" (both the same fabric, either A OR B, these pieces will be the handles)
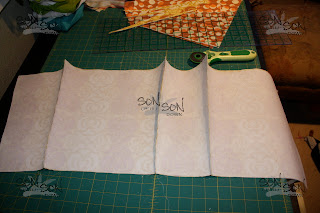
My template for cutting the fabric
To give the tote a taper, so that the bottom is smaller than the top, I lined up my 13"x12" pieces and cut a diagonal. I went from the tip of the top corner to 1.5" in on the bottom (on each side). I did this to all of the pieces.
Here is what it looks like after it is cut
Then I did the same with my 7"x12" pieces, but I only went in 1" on each side
Now it is time to sew. Line up your pieces (trimmed 13"x12" and trimmed 7"x12") like in the picture below. straight stitch making sure to back stitch when you start and finish.
Do that to all four of your pieces from fabric A, and then the same with fabric B
I didn't get a picture of the next step, but you need to sew the bottom on. I find it easiest to start with one of the long edges and then the short edges and then the last long edge. Then you need to sew up the side and it will look like this picture below.
Do the same steps with fabric B and it will look like the picture below when you finish.
Now you can pin and sew around the top, making sure to leave a hole to turn it right side out. If you are making handles, you have an extra step to make the straps and then do this step.
To make the straps iron 1/4" fold on each long side
Then fold it over and iron it flat, sew around the strap. Do the same for the other one. Then pin them onto the inside of the bag (the loop will be down). and sew the bag together, making sure to leave a hole to turn. After it is turned right side out, sew around the top of the bag and you are finished! (sorry I didn't get pictures of these last steps, my camera battery died on me)
Here are the extras that I made (blanket is not made yet, but cut and ready to be sewed)
Just wanted to add that after making it, I think I will make it not so tall next time I make one, and the pockets were an after thought so I didn't get pictures (let me know if you want some tips for adding pockets) AND this tote could be used for soooo many other things, like toys or craft supplies to name a couple!
Linked up at:


No comments:
Post a Comment